Get your pattern making tools and paper out folks – today we’re doing an easy alteration to my latest pattern release - the Fremantle Pants!
This unisex pattern has been designed to sit halfway between the waist and hips, but I'm noticing the ladies making these pants have the inclination to wear them higher! And why not - high waist pants are great.

I have a lot of cropped tops ending a little bit below my waist, and my Fremantle Pants are just a touch too short to wear with them, so I thought it’d be a perfect excuse to make a tutorial on raising the waistline of the Fremantle Pants!
In turn, raising the waistline of the pants will throw off the proportions of the angled side pockets. The current pocket opening is at a good height, so I’d like to keep this, but change the style of the opening to in-seam pockets. I'll cover this in Part 2 of the tutorial!
First things first – I’d recommend making a pair of the Fremantle Pants as they are, so you can see where the existing waistband sits, which will help you figure out how much to add to your pattern alteration.
If you haven't already purchased them - you can find them in my shop here:
Pop your pants on. Tie a length of string or ribbon around your waist/or where you want your waistband to sit. Measure the distance between the string and the top of the waistband. My measurement is 7cm, and I’m going to use this amount the entire way around. But you can take separate measurements at the centre front, centre back and side seams if you have particular fitting issues. This number is how much you’ll be adding along the top of your pattern.
Trace the front pattern piece onto paper. I use butchers paper for when I’m in the altering/playing around stage of pattern making. I trace my patterns onto heavier weight card once finalised if I know they’re going to be a favourite/used often. I much prefer tracing chalk around card onto the fabric, rather than pinning tissue onto the fabric.

Line up the Pocket Bag pattern piece on the Front piece, according to the notches on the Front. (Also, please ignore the fact I wrote 'pocket back' instead of 'pocket bag' on my pattern piece).


Trace around the outer corner to fill in the complete shape of the front piece.

Using your measurement from before (mine is 7cm, so the following instructions will be as 7cm), measure from the top of the pattern piece and make dashes at regular intervals, 7cm up. Join the dashes to a smooth line.

Extend the centre front and side up to meet the new waistline. Use a French Curve if you'd like to keep a subtle curve on the side edge.

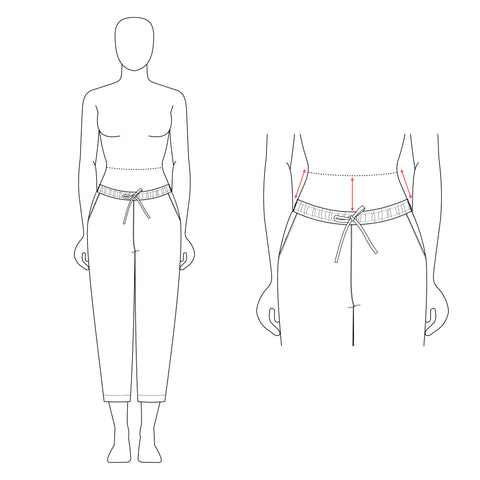
Keep in mind, this is a pull on pant with no fly or button closures. Your new waist opening measurement here needs to be big enough to pull over your hips. After curving in the side edge of the pattern, you need to check that there’s still enough room for your hips and adjust the curve out according. Or you can adjust the line of the side seam straight upwards if the waistband fits over the hips perfectly already and you want to keep the same width at the opening. See the red lines in the following image.

Because I have a relatively flat bum, I won’t be making any changes to the inwards curve of the side seam.
Cut out your new front piece and label your new pattern.

** Because I already have quite a few Fremantle Pants on heavy rotation on my wardrobe, I’m changing this pair into shorts for something a bit different. I hope the following photos will not be too confusing. The steps will all the same, but you’ll notice I’m labelling my pieces as ‘Fremantle Shorts’ from now on.
Trace out the back pattern piece.

As before, make dashes 7cm (or whatever your measurement is) above the top of the Back pattern piece.

Extend the dart upwards and bring the side seams upwards to meet the higher waist. As you can see, following the natural curve of the side seam and extending the darts upwards has decreased the size of the opening. Like I said before, I won't be changing this because I can still get this new measurement over my hips.

If you want to keep your waistband opening at the same measurement, measure straight upwards to mark new points for the side seam and dart openings.
The red lines in the second image show the new, modified pattern shape.

Cut out your new pattern piece.

Now it's time to adjust the waistband pattern piece (if need be).
Mark 1cm seam allowance on Front pattern piece - at the centre front seam and side seam. Line up the centre front seam with the centre fold of the waistband.
Mark a notch on the waistband where the side seam of the Front piece is.

On the Back pattern piece, fold the dart together as it would be sewn. Mark the 1cm seam allowance on the centre back seam and side seam. Line up the centre back seam notch with the side seam notch on the waistband. Mark the new centre back of the waistband.

Mark the new centre back of the waistband.

Last chance to check the waistband measurement is enough to fit over your hips!
That's it for Part 1. I'll cover the in-seam pocket change in Part 2 of the tutorial.
Hope this was easy and clear - feel free to get in touch with me if you're giving this a shot and want anything clarified :-)
And as always, please tag me on Instagram with your makes!! Use the hashtags #fremantlepants and #elbetextiles
Would this alteration work for making the Fremantle pants maternity friendly? Or do you have any other suggestions to that end? Have made several pairs already and I love them- wondering if I could swap out the elastic band for a panel of shirring Igor something like that.