Anyone that follows me on Instagram may have noticed my obsession with patchwork clothing. This is probably the result of my weakness for good quality textiles, and feeling the urge to use up every. damn. piece.
There's no way I want these amazing off-cuts and scraps floating around in landfill and this is one of my favourite ways to use them up.
This is the first dress I made and I've been hooked ever since.
If you're keen to look like a circus tent, then please read on for my take on sewing up a patchwork dress.
If you can't already tell, I prioritise feeling comfortable over looking sexy.

What you will need:
Fabric scraps and off cuts - it helps to have fabrics with a similar weight and drape.
Thread - Choose a colour that blends with the most prominent block of fabric. It's usually safer to go with a darker shade rather than lighter shade.
Sewing Machine and overlocker - the overlocker is not a necessity, but it's my preferred method to finishing seams for this kind of project. I've listed a few other methods for finishing seams below.
Iron and ironing board
Sewing pattern - I like to use something simple and basic with a relaxed fit. The Page Dress is a good start . I usually just follow the top half of a pattern and attach a gathered up rectangle as the skirt.
Pattern making paper/ butchers paper - you can get away without using this, but I find it helpful for step 3.
Let's get down to business.
Step 1.
Organise and collate all your scraps. I like to place ALL my fabrics off cuts on a table and ruminate on how much money I've spent on fabric over the years.
Once you've gotten over this horror, now you can decide which of these fabrics will look good all mashed together in one dress.
I don't have any specific rules on how to choose what fabrics will work together. You really just have to trust your judgement. If you have shit judgement, ask a friend.
I think a mix of solids and patterns is a good start. And within the patterns, it's good to have a mix of large scale and small scale patterns. Checks, stripes, florals, spots - go nuts.
About 6 - 8 different fabrics is a good amount, otherwise it could get overwhelming. Or underwhelming if you choose less than 5. We're aiming for whelmed here.... but only if you're in Europe.
Image: My collection of scraps looking as neat as they've ever been.

Step 2.
Once you've picked which fabrics you'll be using, make sure they're all pressed and flat. I'm going to assume everything has already been pre-washed from the initial projects these fabrics were used for. If not, shame on you and your family.
Seriously though - if your fabrics aren't pre-washed and you sew them altogether, they will experience different rates of shrinkage when you place the finished garment in the wash and create all kinds of crinkly, uneven nightmare seams.
Trim your fabric scraps into even rectangles and squares. Follow the grain, where possible. You will be left with some odd, little pieces, for which I'll be making a blog post later on how I like to use these up.


Step 3.
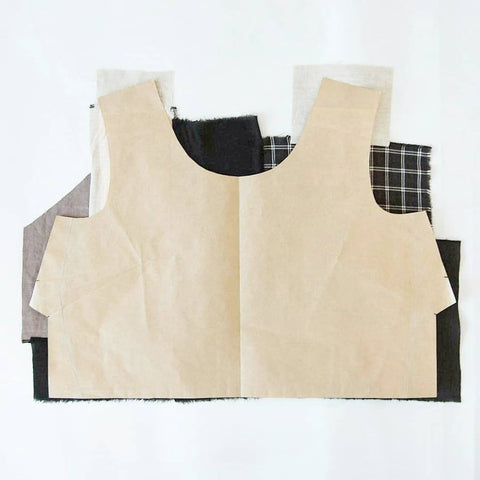
Get your chosen sewing pattern out. I've used a basic, self drafted top for this. The skirt will be a gathered rectangle and doesn't need a pattern. Most commercial pattern pieces have the front and back shown as half pieces to be cut on the fold. For this project, I find it helpful to have the full pattern piece to lay my fabric scraps over. It gives me a better idea of how it'll all come together.
Take some pattern making paper or butchers paper, fold it in half and trace the pattern pieces on. Cut them out and lay out flat.
Image: Front piece of a self drafted top pattern, cut out as a full piece.

Step 4.
Play around by laying your fabric pieces over one of the pattern pieces until you're happy with the array of shapes and colours. I prefer a mix of small, medium and large sized fabric pieces. It can take a while to get the right mix - the perfectionist within me likes to take time with this step.
Step 5.
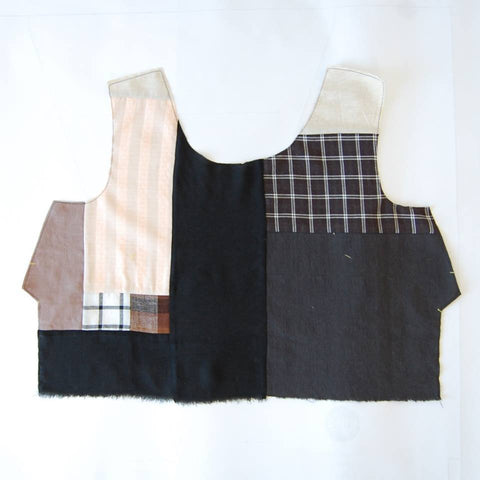
Once you've found the right balance, it's time to start sewing the pieces together.
I sew my pieces together using a 1cm seam allowance and finish them off with an overlocked edge.
If you have the space and ability - it's handy to have your sewing machine, overlocker and iron all set up close together. I switch between the 3 constantly to get a neat finish, pressing as I go.
As a rule of thumb, I sew the smaller pieces together, overlock and press the seam to one side. I then sew this group to it's neighbouring piece. And so on, so forth.
Image: The right side of my front piece, before being cut to shape.

If you don't have an overlocker, or would just prefer another way of finishing your seams, here are a couple of other methods I've tried.
1. French Seams.
Pro: Tis' the epitome of neatness.
Cons: SO time consuming. Could get bulky around the joins, depending on the weight of your fabric.
Image: French seam -right side

Image: French Seam - wrong side

2. Raw edges.
To keep this somewhat neat and contained, I place the wrong sides of my fabric together and stitch together using a 0.8cm seam allowance. I finger press this seam to one side, then topstitch close to the raw edge of the fabric. This almost looks like a twin needle stitch and has the benefit of preventing too much fraying.
Pros: No need for an overlocker. Can look pretty cool on the right fabric. Linen, cotton, hemp etc.
Cons: Can look pretty crap on the wrong fabric.
Choose wisely people. If you're going to use this method, I'd recommend ensuring all your other finishes are very neat - bias bindings on sleeve and neck openings etc. A beautiful faced hem. This will ensure the raw edges in the body of the garment look intentional.
Image: Raw edge - right side

Image: Raw edge - wrong side

Step 6:
Place the pattern piece over your patched together fabric and trace the outline with chalk or a fabric pencil.
Before cutting this out, I like to sew a line of stitching within the chalk outline. This should help stop any of the joined edges coming apart after being cut.

Cut out around the outline. This is the view from the right side.
And the view from the wrong side.

Step 7:
Once you've made up all your pattern pieces in this fashion, then you just sew your garment up as you usually would. I prefer to create the top half of the dress first, before making up the patchwork of the skirt.
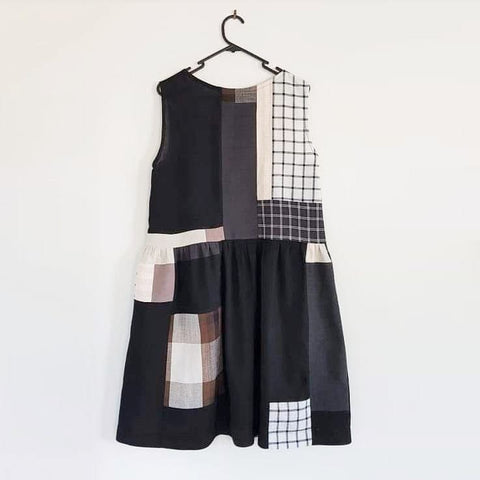
I've finished the neck and arm openings of this dress with bias binding (created from other offcuts) and inserted inseam pockets within the skirt. The hem has been faced.
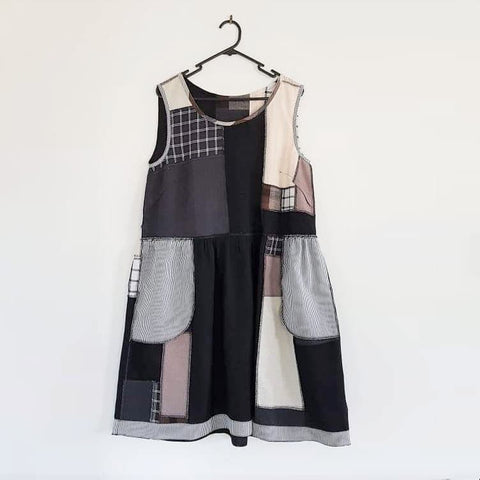
Image: Front view of my finished dress.

Back view
Inside view - featuring inseam pockets and a faced hem.
I haven't photographed this particular dress on the body yet, so have a few photos from my last patchwork dress instead.
Please note: It was windy and I lost my ability to pose.


So there you go. I hope this served as some kind of inspiration to go dive into your scrap bin. Or if you don't keep your scraps - maybe you should start! There is already so much textile waste in landfill and we can all do our part to help minimize this waste.
If you do make up a patchwork garment, I'd love to see it! Tag me on Instagram so I can marvel at your scrap busting wizardry.
Loved this post! Thank you, and also thank you for the chuckles 😆
THANK YOU for this very helpful post! I do like to make clothes AND I am a quilter, but I was not sure exactly how to bring the patchwork skills into the clothing arena. I appreciate your insights and humor! I don’t have an overlocker. I will likely just finish raw seams with zigzag stitch and see how that hold up to wear and laundering. . .
Thank you for this explanation of how to combine scrap fabric to make something fashionable. You cleared up a lot of questions I had.
Many thanks!
Great article! I don’t have instagram, but you inspired me to make this: https://wp.me/pP18P-Y3 (scroll down for pics of the final result).
I appreciate the 10 Things I Hate About You reference. I don’t often choose favorites of anything, but that is definitely one of my favorite movies.