Hey mates - this blog post about adding ruffles to the Duplantier Dress has been written by Jasmin, a very talented human I have had the pleasure of working with on numerous pattern tests. If you're not following already, check out Jasmin on Instagram here. Her posts are always incredibly informative, detailed and inspiring.
If you haven't already, you can buy the Duplantier Dress here.
The Ruffles
The Duplantier Dress offers lots of opportunities for turning it into a very unique garment, that truly represents your style. Not only does the pattern include two different sleeve styles, but you can easily shorten it for a blouse style or add some length and a tier to hack it into a long dress. The instructions suggest to use the panelling of the bodice for customisation with trim detailing and that´s what gave me the idea to add a real statement detail: wing-like ruffles.

It took me several attempts to get these ruffles into the shape that I had in mind. A rectangle pattern piece didn't work, at least not on my body, maybe it would work with someone else's proportions, it needed to have one curved edge for me. Neither did it work to have a ruffle all along the back bodice seams, as it would flap around and have an odd shape. It also needed to have more width for gathering in the back than in the front- or it would flap.


In addition to that, gathering the ruffle worked best with the super lightweight fabrics that IJasmin used for other versions of this dress pattern, a semi-sheer cotton lawn, a cotton single gauze, a 130g/sqm linen. For the midweight linen/cotton broderie anglaise combo it looked better pleated, partly because this way, it was a tad easier to control the bulk.

I figured the best way to provide you with the shape that I ended up with, is to show you the pattern piece on a grid, so you can replicate the grid (or use the one of your cutting mat, if you are lucky enough to have one) and copy the outlines.

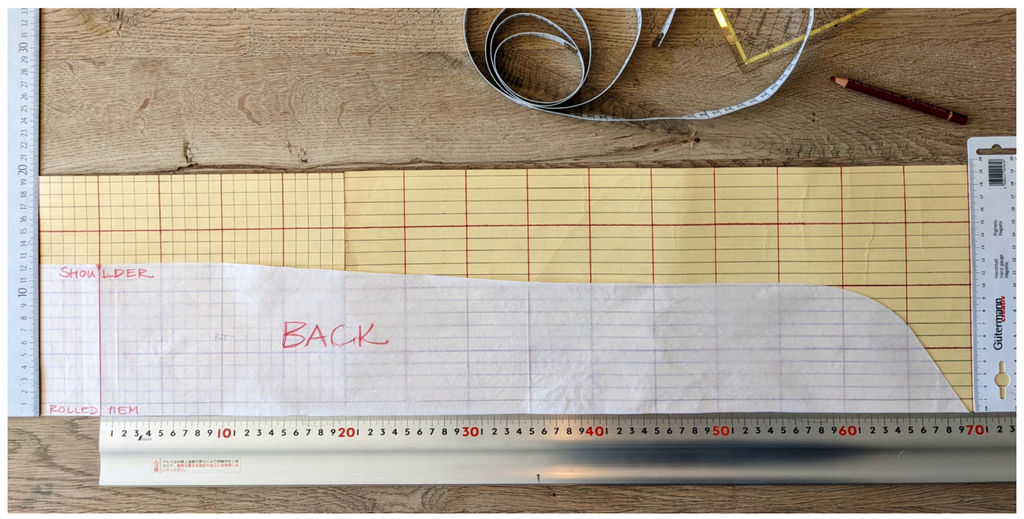
I tried to get the grid as accurate as possible, every grey line marks 1 cm, every red line 5 cm. The pattern piece includes 1 cm of seam allowance and 1 cm of allowance for a rolled hem, the outer extents of each ruffle pattern piece are approx. 12,5 x 140 cm max. The notch that matches the shoulder seam of the bodice is at 70cm. The back ruffle ends 33 cm from the shoulder seam, the last
few centimetres are not gathered. Remember, this is for a size D in the B Cup range, so you might need to adjust (as usual, sewing a toile before cutting in your fancy fabric is strongly recommended).
Prepare and sew your pair of ruffles:
Cut 1 pair
Finish the straight, long edges of the ruffle pieces . I used the rolled hem foot of my sewing machine, as this is the quickest and easiest way to get a neat result. Make sure to feed enough fabric into the hem, or it won´t be rolled properly. I´d suggest to practice on some cutting leftovers first.
Prepare to gather the ruffles by sewing two parallel rows of long stitches along the long, curved edge of the ruffles. Sew the first row of stitches 0.5 cm from the raw edge, the second row 1.5 cm from the raw edge. Do not back tack and leave long tails of thread at both ends.
To set in the ruffles, sew your Duplantier Dress according to the instructions, stop after having completed step 4.
Pin the ruffle pieces onto the side pieces of the bodice, both with their right sides up, seam allowance onto seam allowance. Use one pin to match the notch with the shoulder seam, one to match the curved end with the side back at 33 cm from the shoulder seam, one to match the square end to the bottom front corner of the side front.
Take a hold of both top threads, leaving the bobbin threads, and pull the fabric in to gather it. Keep going until the width of the ruffles matches the length of the front and back side pieces between the pins.
Adjust the gathers evenly. Depending on your sewing skills and confidence, you may now go straight to step 5 of the instructions and catch the ruffle in that seam, or you choose to sew the ruffles onto the side bodice first, with a seam allowance of approx. 0.8-0.9 cm, to make sure it stays hidden in the 1 cm seam allowance of step 5.

Do not remove the gathering threads from the ruffle until you have fully accomplished step 5, including finishing/overlocking the seam allowances. You can remove the second row of stitches, that is outside the seam allowances now.
Taadaaa, your ruffles are done!


