Hey mates, today I'll be showing you how I would do a FBA on the Homme Wrap.
First things first, do you need an FBA?
There are a few ways to tell if you need to do an FBA. If your full bust measurement is larger than the full bust measurement that corresponds to your high bust measurement in the size chart. Also, if you've sewn a toile and there is tightness in the bust, the fabric is pulling forward at the front armhole, or there are drags lines radiating out from the bust.
It's always worth checking the finished garment measurements of your pattern first before starting your FBA.
Being a wrap bodice, this style is far more forgiving than a fully enclosed bodice. So if you're only one or two cup sizes above the C/D cup option, I'd still recommend sewing a toile as is, before going straight to an alteration, as you may find it still fits you well as is.
I've attached an image of the fitting notes from the Homme Wrap instructions that talks about sewing cup sizes (because in case you didn't know, sewing cup sizes are different to bra sizes!).


The combined C/D cup has a 3.5in (9cm) difference between the high bust measurement and full bust measurement.
If you have determined you definitely need the FBA, you'll also need to calculate how much to add to your FBA.
First things first, find your size in the size chart using your high bust measurement.
Check the corresponding full bust measurements of that size. Calculate the difference between the largest full bust size available in your size and your actual full bust size.
Because the front pattern piece is based on half your body, you will need to divide the number by two – that’s how much you'll be adding to the pattern piece.
For example: These measurements below put the wearer in a size D, except for the full bust, which is an F. There is an extra 4in (10cm) between the full bust measurement for size D and size F. Half that is 2in (5cm). So they'd be cutting out size D and doing a FBA of 2in (5cm)

Let's get started.
Take your front bodice pattern piece. Mark where the apex of your bust hits (marked with red cross).
I have also marked the centre front of the bodice (red line). It runs between the two notches as shown. The grainline runs parallel to this.

Mark the 1cm seam allowance around the lower curve of the armscye (red line).
Draw 3 lines (shown in blue)
1. From the bust point to the curve of the armscye.
2. From the bust point to the side seam
3. From the bust point to the halfway point between the waist darts.

Cut through line 3, starting at the hem. Pivot at the bust point and continue cutting through line 1, stopping at the seam allowance you drew in (red line). Cut a small notch through the seam allowance at line 1, leaving a small paper hinge at the sewing line.
Cut through line 2, stopping just before the bust point, leaving another small paper hinge.

Take a blank piece of paper, larger than the pattern piece. Place the pattern on top.
Measure the distance of your FBA from line 3 (5cm in my example). You can draw these lines in on the piece of blank paper if you like (green lines).
Please note, I've redrawn the bust point (red cross) to sit in the middle of the added width.

Cut a line from the bust apex to the centre front notch (shown in purple). Slide this piece down so the hem lines are aligned.
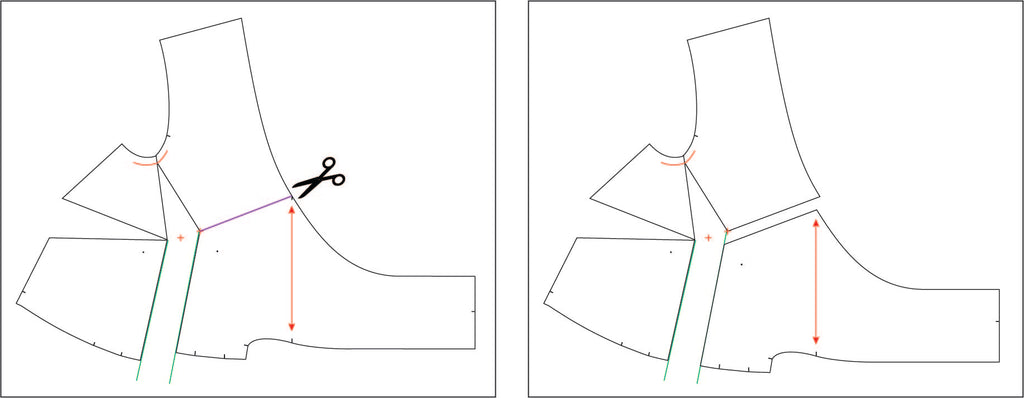
Re-draw your front neckline, blending between the pieces to get a smooth line (shown in orange).

Now we're at a point where the waist seam of the front bodice has an excess of fabric and won't fit to the pants/skirt as intended. There are multiple options as to what you can do next - it's really up to you and your design preferences.
I'll list a couple of options below.
1. Turn the extra fullness from the waist into a third waist dart (new dart shown in a dashed line), by pivoting the bottom left piece upwards and closing the gap in the side seam.

Or
2. Take the extra fullness from the waist by pivoting the bottom left piece (marked as 1) to meet the bottom right piece. This will increase the size of the wedge in the side seam. You can turn this into a dart, but you will need to re-draw it so the dart point sits further away from the bust point. (new dart shown in a dashed line. Have also trued the side seam of the dart in blue) and re-shaped the waist seam to have more of a gentle curve (yellow line).

Alternatively, you could take the extra fullness created from your FBA and rotate it into the existing darts. If you're adding a significant amount in though, the only issue with this method is that your darts will be quite wide. And the wider the dart, the pointier the tip. Having 3 darts will create a smoother curve around the bust.
But as I said before, it's really up to you and how you want this top to look and what works best for your body.
Hope this helps!
x Lauren
“Hey there!
Thanks for this practical guide on how to do a full bust adjustment for the the Homme Wrap <a href=""http://www.epsilonpatternsandgrading.com/"">sewing patterns for a perfect fit. I appreciate the clear steps in determining if an FBA is necessary, especially the tips about checking the bust measurements before diving into alterations. The comparison between sewing cup sizes and bra sizes was an eye-opener for me and makes the process easier to understand. Your straightforward explanations and the attached image from the instructions are incredibly helpful!"